One of the top features that makes Direct2D a prime candidate for developing image editing software is the inclusion of effects. These are much like the image filters that applications like Photoshop or paint.net ship with, and are fully hardware accelerated since their underlying implementation is shader-based so they execute in the GPU. An effect can have multiple input images and multiple input parameters but only one output image, which is the result of all the operations that it performs applied sequentially. Internally, an effect has a graph of atomic operations, which can have multiple steps. For example, a Gaussian blur could be implemented like this:
- One input image.
- One input variable (blur radius).
- Two steps:
- Apply horizontal blur to input image.
- Apply vertical blur to output of first step.
However, built-in effects are totally transparent to the final user so we can know what they do but not how they do it. We will explore how custom effects work in future examples. In this tutorial we are going to learn how to use some of the built-in effects that Direct2D already implements. These are some of the most commonly used image filtering techniques (like color adjustment and blurring), and are part of the native library. We are going to modify the previous tutorial to perform a hue rotation operation in the player’s bitmap and a shadow effect in the terrain’s one.
Rendering a brush to an offscreen bitmap
First of all, since effects must be applied to bitmaps and we are drawing our terrain portion with a brush, we need to render it to an off-screen bitmap so we can postprocess it. Start by declaring a new SharpDX.Direct2D1.Bitmap1 variable and proceed to initialize it via its constructor. The size would be the total size of the rectangle we were drawing with the brush (in this case, ten times the bitmap’s width and one time the height). Inside the SharpDX.Direct2D1.BitmapProperties1 make sure you:
- Declare the same pixel format as the backbuffer is using (Format.B8G8R8A8_UNorm and AlphaMode.Premultiplied),
- Specify the BitmapOptions.Target options so it can be used as a target for drawing.
Now we can modify the drawing code we were using so we set this bitmap as the Direct2D context target, clear it to a transparent background color, reset the drawing transform to Matrix3x2.Identity and draw the rectangle:
- // Set the render target for drawing the brush
- d2dContext.Target = brushTarget;
- // Clear the rendertarget and draw the brush tiling 10 times
- d2dContext.BeginDraw();
- d2dContext.Clear(Color.Transparent);
- d2dContext.Transform = Matrix3x2.Identity;
- d2dContext.FillRectangle(newRectangleF(0, 0, terrainBitmap.Size.Width * 10, terrainBitmap.Size.Height), terrainBrush);
- d2dContext.EndDraw();
And here is the bitmap as it is rendered offscreen: 
Initializing effect instances
Next, we are going to initialize the effect instances. For the hue rotation we only need a SharpDX.Direct2D1.Effects.HueRotation instance, but for the shadow effect we are going to follow this approach:
- Create a SharpDX.Direct2D1.Effects.Shadow effect and set the offscreen bitmap as its input.
- Create a SharpDX.Direct2D1.Effects.AffineTransform2D, set the shadow effect instance as its input and set the TransformMatrix to a translation matrix that will add a small offset to the shadow.
- Blend the original image and the resulting shadow trough a SharpDX.Direct2D1.Effects.Composite effect. We need to set its InputCount to two, the affine transform effect as the first input and the offscreen bitmap as the second (since blending is done back to front).
- // Create hue rotation effect
- hueRotationEffect = new SharpDX.Direct2D1.Effects.HueRotation(d2dContext);
- // Create image shadow effect
- shadowEffect = new SharpDX.Direct2D1.Effects.Shadow(d2dContext);
- // Create image transform effect
- affineTransformEffect = new SharpDX.Direct2D1.Effects.AffineTransform2D(d2dContext);
- affineTransformEffect.SetInputEffect(0, shadowEffect);
- affineTransformEffect.TransformMatrix = Matrix3x2.Translation(terrainBitmap.PixelSize.Width * 0.25f, terrainBitmap.PixelSize.Height * 0.25f);
- // Create composite effect
- compositeEffect = new SharpDX.Direct2D1.Effects.Composite(d2dContext);
- compositeEffect.InputCount = 2;
- compositeEffect.SetInputEffect(0, affineTransformEffect);
Drawing the effects output
At last, we go back to the render block and modify how the bitmaps are drawn. First we update the effects with their updated inputs/values, and then we use DrawImage instead of DrawBitmap to draw the output of an effect:
- // Update input images for shadow and composite effects, and draw the resulting image.
- shadowEffect.SetInput(0, brushTarget, true);
- compositeEffect.SetInput(1, brushTarget, true);
- d2dContext.DrawImage(compositeEffect);
- // Translate again for drawing the player bitmap.
- d2dContext.Transform = Matrix3x2.Translation(halfWidth, halfHeight – playerBitmap.Size.Height);
- // Update input image and value for hue rotation effect and draw it.
- hueRotationEffect.SetInput(0, playerBitmap, true);
- hueRotationEffect.Angle = System.DateTime.Now.Millisecond % 360;
- d2dContext.DrawImage(hueRotationEffect);
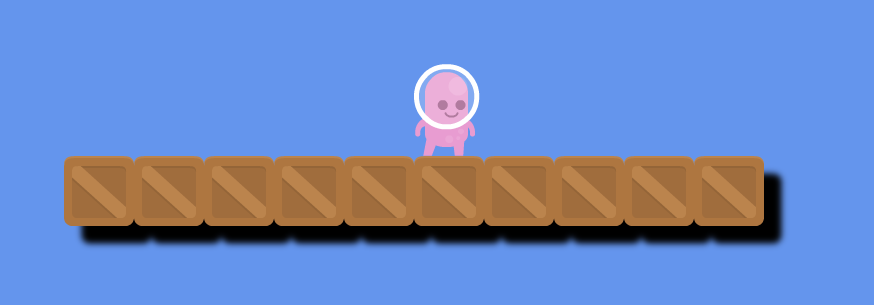
Here you can see a screen capture of how the scene would look like: 
Source code
As always, you can download the source code (C#/VS 2013, SharpDX 2.6.2) for this sample from its GitHub repository.