Proper lifecycle management of SharpDX resources in C#/XAML Universal Apps

In the last tutorial we learned how to properly use SharpDX in our XAML apps so we can get the power of DirectX without having to touch native C++ code. However, it was a very superficial introduction for demonstrative purposes that didn’t take into account anything more than single page applications. Using that code in real-world applications would introduce lots of problems (memory leaks, bad performance, crashes) that we are going to learn how to fix in this article. So, we are going to learn how to extend that code so it behaves better when our application has page navigation, gets snapped or is suspended/reactivated.

Now that we are focusing on integrating SharpDX with XAML applications, we have to take into account proper finalization of the created resources when navigating away from pages that contain SwapChainPanel/SwapChainBackgroundPanel controls.

Start by adding a new Page to the shared project. Add a button in MainPage to navigate to the new page, and another one there to make the frame go back in the navigation stack so we don’t end with an infinite navigation loop. If you run the project you will see that it works correctly; however, there is a small problem that can only be spotted by running the Performance and Diagnostics tool with the Memory Usage option selected:

leak


There is a memory leak in the application, because when we are navigating away from the page, we aren’t disposing any of the SharpDX resources we have created for rendering. And since they are wrappers over native objects, they will hardly be automatically reclaimed by the garbage collector.

But this has a very easy solution. Since we subscribed to the Loaded event of the SwapChainPanel for creating everything, we can subscribe to the Unloaded one and perform the opposite operations:

private void SwapChainPanel_Unloaded(object sender, RoutedEventArgs e)
{
    CompositionTarget.Rendering -= CompositionTarget_Rendering;    using (DXGI.ISwapChainPanelNative nativeObject = ComObject.As<DXGI.ISwapChainPanelNative>(this.SwapChainPanel))
    {
        nativeObject.SwapChain = null;
    }

    Utilities.Dispose(ref this.backBufferView);
    Utilities.Dispose(ref this.backBufferTexture);
    Utilities.Dispose(ref this.swapChain);
    Utilities.Dispose(ref this.deviceContext);
    Utilities.Dispose(ref this.device);
}


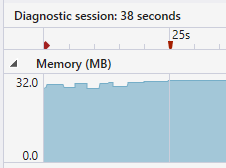
If we run again the memory diagnostics tool, we can verify that all allocated memory is properly being released when navigating away from the page:

leak_fixed


Window resizing

UPDATE: SourceSize isn’t the most appropriate approach to use when the application is being snapped, since it’s thought for uniformly scaling the swap chain to smaller sizes in less powerful hardware; using it this way will stretch the output image when drawing with Direct 3D. In this case, setting a different viewport will be enough.

Now we take into account when resizing happens so the swap chain dimensions match those of the control it is associated with. DirectX 11.2 introduced the new SourceSize property for DXGI.SwapChain2 objects, which lets you specify a region equal or smaller than the swap chain’s total size so you don’t have to always destroy and recreate it, only in the cases that a bigger one is needed.

Let’s subscribe to the SizeChanged event of the SwapChainPanel to accomplish this. But, this event can fire before the Loaded one if we don’t specify a default size for the control. To check that our swap chain is initialized and ready for resizing, we must declare a boolean flag (in our case it’s named isDXInitialized) and set it to true at the end of the SwapChainPanel_Loaded function. Now we can safely resize set the SourceSize property:

private void SwapChainPanel_SizeChanged(object sender, SizeChangedEventArgs e)
{
    if (isDXInitialized)
    {
        Size2 newSize = RenderSizeToPixelSize(e.NewSize);
        swapChain.SourceSize = newSize;
    }
}

This will work nicely in a number of cases but it’s far from perfect. Remember that I said that the specified region should be equal or smaller in size to the swap chain’s dimensions? If you make the control bigger at runtime or launch the application in snapped mode and resize it to full screen, you will receive a 0x887A0001 (DXGI_ERROR_INVALID_CALL) exception.

So, the logic outcome is to check the new size of the control and resize the swap chain if a bigger one is needed then set the SourceSize property, isn’t it?

private void SwapChainPanel_SizeChanged(object sender, SizeChangedEventArgs e)
{
    if (isDXInitialized)
    {
        Size2 newSize = RenderSizeToPixelSize(e.NewSize);        if (newSize.Width > swapChain.Description1.Width || newSize.Height > swapChain.Description1.Height)
        {
            swapChain.ResizeBuffers(swapChain.Description.BufferCount, (int)e.NewSize.Width, (int)e.NewSize.Height, swapChain.Description1.Format, swapChain.Description1.Flags);
        }

        swapChain.SourceSize = newSize;
    }
}


While technically true, it is still missing a minor detail: all resources linked to a swap chain must be destroyed before calling SwapChain2.ResizeBuffers. In our case it’s the render target and its associated resource view, so if you call the previous code as-is, you will receive the a dreaded DXGI_ERROR_INVALID_CALL exception again.

To fix this, we must destroy the associated resources, resize the swap chain and recreate them:

private void SwapChainPanel_SizeChanged(object sender, SizeChangedEventArgs e)
{
    if (isDXInitialized)
    {
        Size2 newSize = RenderSizeToPixelSize(e.NewSize);        if (newSize.Width > swapChain.Description1.Width || newSize.Height > swapChain.Description1.Height)
        {
            Utilities.Dispose(ref this.backBufferView);
            Utilities.Dispose(ref this.backBufferTexture);

            swapChain.ResizeBuffers(swapChain.Description.BufferCount, (int)e.NewSize.Width, (int)e.NewSize.Height, swapChain.Description1.Format, swapChain.Description1.Flags);

this.backBufferTexture = D3D11.Texture2D.FromSwapChain<D3D11.Texture2D>(this.swapChain, 0);
            this.backBufferView = new D3D11.RenderTargetView(this.device, this.backBufferTexture);
        }

        swapChain.SourceSize = newSize;
    }
}


Application suspension

At last, we are going to implement a new requisite when creating Windows Store apps that use DirectX: calling the DXGI.Device3.Trim method when the app goes into suspension. This function frees some internal buffers created by the graphics driver for faster performance and must be used to reduce the app’s memory footprint so there are less chances of it being terminated while suspended. The buffers will be transparently recreated when the app is reactivated, introducing only a minor execution delay.

So, let’s subscribe to the Suspending event of the current Application instance inside the SwapChainPanel_Loaded function, and unsubscribe inside SwapChainPanel_Unloaded to ensure proper finalization. Our new function will perform minimal processing, calling only DeviceContext.ClearState and Device3.Trim as per the guidelines. Since we aren’t storing an instance of DXGI.Device3, you can use QueryInterface on the current Direct3D 11.2 device or call GetDevice on the swap chain; remember to put it inside an using block or dispose it manually since both calls return a new object that needs to be freed:

private void Application_Suspending(object sender, Windows.ApplicationModel.SuspendingEventArgs e)
{
    if (isDXInitialized)
    {
        this.deviceContext.ClearState();        using (DXGI.Device3 dxgiDevice3 = this.swapChain.GetDevice<DXGI.Device3>())
        {
            dxgiDevice3.Trim();
        }
    }
}


Source code

As always, you can get the full soure code (Windows Store C#/XAML Universal App project, compatible with Visual Studio 2013 only) from GitHub.

LockScreen.SetImageUri fails sometimes on Windows Phone 8.1 devices

While working on a Silverlight for Windows Phone 8.1 app that uses the lock screen API, some beta testers reported that the app didn’t work as expected. The lock screen wasn’t being changed to the desired picture, instead using the default Windows Phone background image. Worst of all, this was happening to a very specific subset of users; even with the same phone model, in some cases it failed and in others it didn’t.

Trying to spot what failed was an easy task. Thanks to BugSense I knew that what was failing was the call to SetImageUri, with a poorly descriptive ArgumentException:

System.ArgumentException: Value does not fall within the expected range.

The problem was that I knew that setting the image was failing, but not why. I followed all the “best practices” I could find:

  • Saving the images to the Shared/ShellContent subfolder.
  • Changing the image size.
  • Changing the format from JPG to PNG.
  • Ensuring that the file was correctly being written to, and that all handles were properly closed.
  • Setting the Uri’s UriKind to UriKind.Absolute.

The problem persisted. Then, I found a common occurrence between all cases: it was only happening in low-end models. Specifically, those that had support for SD cards. So I went to the WMAppManifest.xml and checked Prevent deployment to SD cards in the Packaging tab.

The problem was gone. The LockScreen.SetImageUri function only fails if the app has been installed to an external SD card and you are trying to set an image saved to the application’s storage folder (ms-appdata:/// prefix). The ones packaged as content files (ms-appx:///) never fail!

And don’t ever bother trying to spot this bug using the emulator. While it allows you to simulate SD card support, it won’t fail there.

Applying Direct2D built-in effects to bitmaps with SharpDX

One of the top features that makes Direct2D a prime candidate for developing image editing software is the inclusion of effects. These are much like the image filters that applications like Photoshop or paint.net ship with, and are fully hardware accelerated since their underlying implementation is shader-based so they execute in the GPU. An effect can have multiple input images and multiple input parameters but only one output image, which is the result of all the operations that it performs applied sequentially. Internally, an effect has a graph of atomic operations, which can have multiple steps. For example, a Gaussian blur could be implemented like this:

  • One input image.
  • One input variable (blur radius).
  • Two steps:
    • Apply horizontal blur to input image.
    • Apply vertical blur to output of first step.

However, built-in effects are totally transparent to the final user so we can know what they do but not how they do it. We will explore how custom effects work in future examples. In this tutorial we are going to learn how to use some of the built-in effects that Direct2D already implements. These are some of the most commonly used image filtering techniques (like color adjustment and blurring), and are part of the native library. We are going to modify the previous tutorial to perform a hue rotation operation in the player’s bitmap and a shadow effect in the terrain’s one.

Rendering a brush to an offscreen bitmap

First of all, since effects must be applied to bitmaps and we are drawing our terrain portion with a brush, we need to render it to an off-screen bitmap so we can postprocess it. Start by declaring a new SharpDX.Direct2D1.Bitmap1 variable and proceed to initialize it via its constructor. The size would be the total size of the rectangle we were drawing with the brush (in this case, ten times the bitmap’s width and one time the height). Inside the SharpDX.Direct2D1.BitmapProperties1 make sure you:

  • Declare the same pixel format as the backbuffer is using (Format.B8G8R8A8_UNorm and AlphaMode.Premultiplied),
  • Specify the BitmapOptions.Target options so it can be used as a target for drawing.

Now we can modify the drawing code we were using so we set this bitmap as the Direct2D context target, clear it to a transparent background color, reset the drawing transform to Matrix3x2.Identity and draw the rectangle:

  1. // Set the render target for drawing the brush
  2. d2dContext.Target = brushTarget;
  3. // Clear the rendertarget and draw the brush tiling 10 times
  4. d2dContext.BeginDraw();
  5. d2dContext.Clear(Color.Transparent);
  6. d2dContext.Transform = Matrix3x2.Identity;
  7. d2dContext.FillRectangle(newRectangleF(0, 0, terrainBitmap.Size.Width * 10, terrainBitmap.Size.Height), terrainBrush);
  8. d2dContext.EndDraw();

And here is the bitmap as it is rendered offscreen: Image as it is drawn offscreen

Initializing effect instances

Next, we are going to initialize the effect instances. For the hue rotation we only need a SharpDX.Direct2D1.Effects.HueRotation instance, but for the shadow effect we are going to follow this approach:

  • Create a SharpDX.Direct2D1.Effects.Shadow effect and set the offscreen bitmap as its input.
  • Create a SharpDX.Direct2D1.Effects.AffineTransform2D, set the shadow effect instance as its input and set the TransformMatrix to a translation matrix that will add a small offset to the shadow.
  • Blend the original image and the resulting shadow trough a SharpDX.Direct2D1.Effects.Composite effect. We need to set its InputCount to two, the affine transform effect as the first input and the offscreen bitmap as the second (since blending is done back to front).
  1. // Create hue rotation effect
  2. hueRotationEffect = new SharpDX.Direct2D1.Effects.HueRotation(d2dContext);
  3. // Create image shadow effect
  4. shadowEffect = new SharpDX.Direct2D1.Effects.Shadow(d2dContext);
  5. // Create image transform effect
  6. affineTransformEffect = new SharpDX.Direct2D1.Effects.AffineTransform2D(d2dContext);
  7. affineTransformEffect.SetInputEffect(0, shadowEffect);
  8. affineTransformEffect.TransformMatrix = Matrix3x2.Translation(terrainBitmap.PixelSize.Width * 0.25f, terrainBitmap.PixelSize.Height * 0.25f);
  9. // Create composite effect
  10. compositeEffect = new SharpDX.Direct2D1.Effects.Composite(d2dContext);
  11. compositeEffect.InputCount = 2;
  12. compositeEffect.SetInputEffect(0, affineTransformEffect);

Drawing the effects output

At last, we go back to the render block and modify how the bitmaps are drawn. First we update the effects with their updated inputs/values, and then we use DrawImage instead of DrawBitmap to draw the output of an effect:

  1. // Update input images for shadow and composite effects, and draw the resulting image.
  2. shadowEffect.SetInput(0, brushTarget, true);
  3. compositeEffect.SetInput(1, brushTarget, true);
  4. d2dContext.DrawImage(compositeEffect);
  5. // Translate again for drawing the player bitmap.
  6. d2dContext.Transform = Matrix3x2.Translation(halfWidth, halfHeight – playerBitmap.Size.Height);
  7. // Update input image and value for hue rotation effect and draw it.
  8. hueRotationEffect.SetInput(0, playerBitmap, true);
  9. hueRotationEffect.Angle = System.DateTime.Now.Millisecond % 360;
  10. d2dContext.DrawImage(hueRotationEffect);

Here you can see a screen capture of how the scene would look like: Final drawing result

Source code

As always, you can download the source code (C#/VS 2013, SharpDX 2.6.2) for this sample from its GitHub repository.