Adding tiled backgrounds to UWP apps with Win2D

One of the many features that Silverlight never got from WPF was the ability to tile or repeat the image used on an ImageBrush. However, it had some workarounds like applying a custom pixel shader to get the same result – but, since the Silverlight version used on Windows Phone was even more limited, there hasn’t been a proper replacement (other than hacks based on displaying multiple images on a custom Panel control) in either Silverlight for Windows Phone, Windows Runtime or the new UWP platform.

Thankfully, now we have Win2D which combines the powerful graphical capabilities of Direct2D with the easiness of use of the XAML stack – and in this tutorial we are going to learn how to add a tiled background to our UWP app with very little code.

Approach

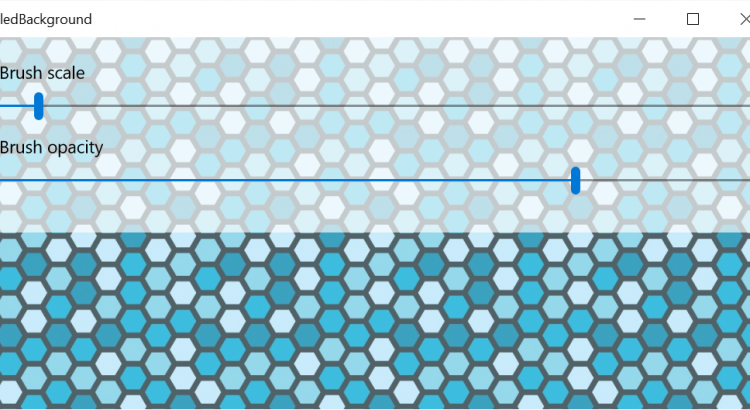
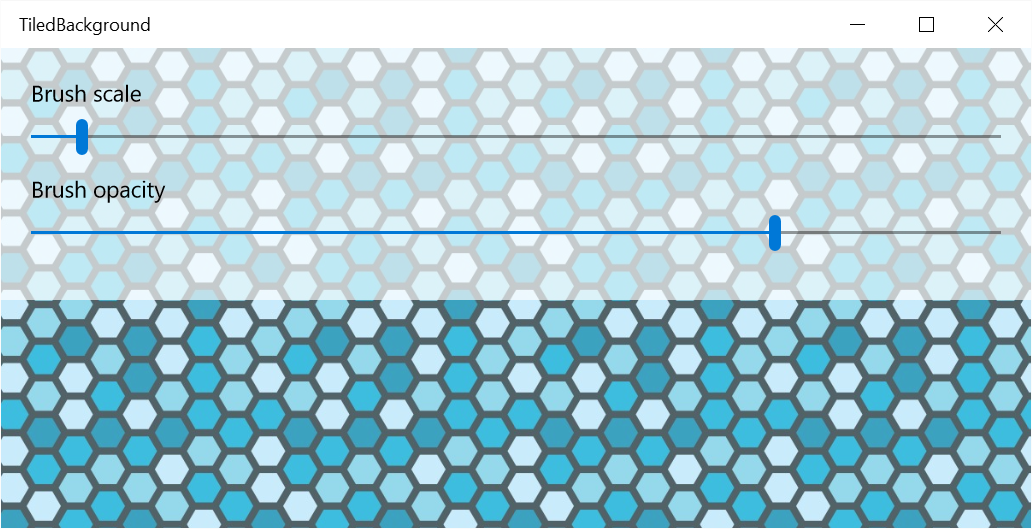
The premise is very simple – we will put an instance of Win2D’s CanvasControl in the root container of the page so it draws behind everything else, set both of its alignments to Stretch and fill it entirely using a CanvasImageBrush. Also, in the demo project, we will add some UI controls to tweak the scaling and opacity values to better showcase the flexibility of image brushes.

So, let’s get started!

Implementation

Start by adding the Win2D library from NuGet on your project, and as stated before, adding a CanvasControl element to the XAML page you want to. Hook up its CreateResources and Draw events and let’s jump to the code behind.

Declare two fields of type CanvasBitmap and CanvasImageBrush, as we will need them to hold the references to the background image and the brush that will be used for drawing, respectively. Then we can proceed to initialize them in the event handler for CreateResources that we added previosly – but wait, there’s a catch!

Win2D’s CanvasControl is nice enough to start drawing only when all resources have been loaded. But we have a problem: our event handler is of type void and we will need to do some asynchronous calls inside it; adding the async modifier to it won’t solve anything since async void methods are fire-and-forget. The answer is to use CanvasCreateResourcesEventArgs.TrackAsyncAction.

By wrapping all our async calls inside a Task and casting it to an IAsyncAction by calling AsAsyncAction, we can pass all our resource loading operation to the CanvasControl so it can track when they have completed, and start issuing draw events. Sounds a bit confusing? It can be at first, so check the following code snippet:

[code lang=”csharp”]
private void BackgroundCanvas_CreateResources(CanvasControl sender, CanvasCreateResourcesEventArgs args)
{
args.TrackAsyncAction(Task.Run(async () =>
{
// Load the background image and create an image brush from it
this.backgroundImage = await CanvasBitmap.LoadAsync(sender, new Uri("ms-appx:///Background.jpg"));
this.backgroundBrush = new CanvasImageBrush(sender, this.backgroundImage);

// Set the brush’s edge behaviour to wrap, so the image repeats if the drawn region is too big
this.backgroundBrush.ExtendX = this.backgroundBrush.ExtendY = CanvasEdgeBehavior.Wrap;

this.resourcesLoaded = true;
}).AsAsyncAction());

}
[/code]

As you can see, we just load our background image from disk and create the CanvasImageBrush with it. And to make it tile properly, we change both ExtendX and ExtendY to CanvasEdgeBehavior.Wrap – the default value is CanvasEdgeBehavior.Clamp which just extends indefinitely the last row or column of pixels.

That’s it for the initialization. Now let’s proceed with the drawing function, which is even easier, since we just fill a rectangle with the same size as the bound’s controls using the brush we have just created:

[code lang=”csharp”]
private void BackgroundCanvas_Draw(CanvasControl sender, CanvasDrawEventArgs args)
{
// Just fill a rectangle with our tiling image brush, covering the entire bounds of the canvas control
var session = args.DrawingSession;
session.FillRectangle(new Rect(new Point(), sender.RenderSize), this.backgroundBrush);
}
[/code]

Tiled background using Win2D

And that’s it! We now have a nicely tiling background. And to add a bit more of flexibility, we are going to explore the possibility of changing the size of the tiled image (by default it draws it with the same physical size as the source image) and its opacity. Add two Slider controls and hook their ValueChanged events – one for the scale, another for the opacity.

Let’s start with the opacity one. We will just divide its value by 100 (since Slider controls only support integer values, and the opacity range goes from 0.0 to 1.0) and assign it to the Opacity value of our ImageBrush. The call to CanvasControl.Invalidate will force a redraw of the background canvas so it updates accordingly:

[code lang=”csharp”]
private void OpacitySlider_ValueChanged(object sender, RangeBaseValueChangedEventArgs e)
{
// Don’t modify the brush properties if it hasn’t been initialized yet
if (!this.resourcesLoaded)
{
return;
}

// Change the opacity of the brush
this.backgroundBrush.Opacity = (float)(e.NewValue / 100.0);
this.BackgroundCanvas.Invalidate();
}
[/code]

Wait a minute – notice the resourcesLoaded flag? We added it so we don’t change any brush properties before it has been created. Just create it as a boolean field and set it to true at the end of the Task that creates your graphics resources.

And finally, let’s tackle the image scaling. This will be as easy as creating a Matrix3x2 that holds a transform (in our case, one that only has scaling) and assigning it to the brush’s Transform property. We can do lots of thing with this – rotate the brush image, skew it… your imagination is the limit!

[code lang=”csharp”]
private void ScaleSlider_ValueChanged(object sender, RangeBaseValueChangedEventArgs e)
{
// Don’t modify the brush properties if it hasn’t been initialized yet
if (!this.resourcesLoaded)
{
return;
}

// Apply a scale matrix transform to the brush; this way we can control how big the image will be drawn
this.backgroundBrush.Transform = System.Numerics.Matrix3x2.CreateScale((float)(e.NewValue / 100.0));
this.BackgroundCanvas.Invalidate();
}[/code]

Tiled background with opacity and scale selection controls

Source code

Get the full source code for this tutorial’s project on the Win2D-Samples GitHub repository – it’s sitting on the TiledBackground folder.

Creating custom video effects in UWP apps

One of the biggest shortcomings of WinRT for Windows/Windows Phone 8.1 was the state of media APIs – you could play a video file in a MediaElement but anything that involved extracting frames or applying effects was very cumbersome, as you had to put your code in a Windows Runtime Component, and worse of all, you had to write it in C++/CX.

Thankfully UWP has come to save the day, and while you still need to use Windows Runtime Components for writing this functionality (with its associated limitations, like making all your public classes sealed), now you can use C# for things like custom video effects, and more importantly, you don’t have to tweak the application manifest anymore to declare the Extension/ActivatableClass for them to be available! Other improvements include new classes like MediaClip, which allows you to load individual videos, and MediaComposition, which lets you create a media timeline to stitch together video clips and render them as a full length video.

In this tutorial we are going to learn how to create a basic custom video effect that implements the IBasicVideoEffect interface for rendering a video in grayscale, and how to apply it to a MediaClip before playing it through a MediaElement.

Implementation

We are going to create a new UWP application project and add a MediaElement to the main page’s XAML. We will come back to this later when we have our video effect ready – but you can try fiddling around and make it play the video on your own, it should look something like this:

Playing a video file in UWP

Now, add a new Windows Runtime Component project to the solution and add a new class to it. This is were we will implement our video effect based on IBasicVideoEffect, and this is very important as trying to implement it on another project type will throw a COMException with error messages Failed to activate video effect/Class not registered when trying to use the effect later.

Now that you have the class that will hold the code and it implements the appropriate interface, let’s walk through all the properties and methods that IBasicVideoEffect provides:

[code lang=”csharp”]
public bool IsReadOnly
{
get { return true; }
}
[/code]

IsReadOnly will return true if our effect doesn’t modify the input frame in any way. Since we are just going to get a source frame and apply a colour transform to it for drawing, we are going to set it as true.

[code lang=”csharp”]
public IReadOnlyList<VideoEncodingProperties> SupportedEncodingProperties
{
get { return new List<VideoEncodingProperties>(); }
}
[/code]

SupportedEncodingProperties returns a list of the video formats that our effect will support when outputting the processed video frame. As per the documentation, returning an empty list will give us frames in plain RGB format, which will be the easiest one to work on, so let be it.

[code lang=”csharp”]
public MediaMemoryTypes SupportedMemoryTypes
{
get { return MediaMemoryTypes.Cpu; }
}
[/code]

SupportedMemoryTypes is an enum that lets us specify if our effect will use the CPU, GPU or both for processing the frames. We want to set it to Cpu since this will give us access to the frame data through SoftwareBitmap, otherwise we would get handles to Direct3D data types.

[code lang=”csharp”]
public bool TimeIndependent
{
get { return true; }
}
[/code]

TimeIndependent lets us specify if our effect can be used while the playing video is in any playback state. We are going to modify the data per frame so we are going to set it to true.

[code lang=”csharp”]
public void Close(MediaEffectClosedReason reason)
{
}

public void DiscardQueuedFrames()
{
}

public void SetEncodingProperties(VideoEncodingProperties encodingProperties, IDirect3DDevice device)
{
}

public void SetProperties(IPropertySet configuration)
{
}
[/code]

These functions have pretty self explanatory names and we aren’t going to go through them since they aren’t used in this tutorial – however you can check the source code of the sample project for a brief explanation on what they are used for.

Finally, let’s explain what the ProcessFrame function does – the most important one, and the one we will be using for processing the frame data and applying our desired effect to the video clip.

[code lang=”csharp”]
public void ProcessFrame(ProcessVideoFrameContext context)
{
var inputFrameBitmap = context.InputFrame.SoftwareBitmap;

// Create intermediate buffer for holding the frame pixel data.
var frameSize = inputFrameBitmap.PixelWidth * inputFrameBitmap.PixelHeight * 4;
var frameBuffer = new Buffer((uint)frameSize);

// Copy bitmap data from the input frame.
inputFrameBitmap.CopyToBuffer(frameBuffer);

// Iterate through all pixels in the frame.
var framePixels = frameBuffer.ToArray();
for (int i = 0; i < frameSize; i += 4)
{
// Calculate the luminance based on the RGB values – this way we can convert it to grayscale.
var bValue = framePixels[i];
var gValue = framePixels[i + 1];
var rValue = framePixels[i + 2];

var luminance = ((rValue / 255.0f) * 0.2126f) +
((gValue / 255.0f) * 0.7152f) +
((bValue / 255.0f) * 0.0722f);

// Set the pixel data to the calculated grayscale values.
framePixels[i] = framePixels[i + 1] = framePixels[i + 2] = (byte)(luminance * 255.0f);
}

// Copy the modified frame data to the output frame.
context.OutputFrame.SoftwareBitmap.CopyFromBuffer(framePixels.AsBuffer());
}
[/code]

This function receives a ProcessVideoFrameContext as its only parameters, and it stores everything we need for applying our effect. The original frame for the video is stored inside the InputFrame member, and since we specified CPU processing, all the data for the frame image is in a convenient SoftwareBitmap in plain RGB (though in this case it’s ordered in BGR format) data.

We will start by getting the pixel data in a Buffer, and temporarily casting all its contents to a byte[]. Then, we iterate through it in increments of 4 bytes (since the frame has an alpha channel, too) and obtain the grayscale value via the relative luminance formula. Once this is done, we overwrite the R, G and B bytes with the luminance value, effectively obtaining a grayscale value with the same intensity as the source color. Finally, we copy our data buffer to the SoftwareBitmap of the output frame, and we will have a fully working custom video effect.That was easy, wasn’t it?

Back to our XAML page, hook up the Loaded event of the MediaElement (we have called it VideoPlayer since we will have to reference it later). Let’s open the code behind file and write the code for loading and playing the video file:

[code lang=”csharp”]
private async void VideoPlayer_Loaded(object sender, RoutedEventArgs e)
{
// Load video file
var videoFile = await Package.Current.InstalledLocation.GetFileAsync("big_buck_bunny.mp4");

// Create a MediaClip from the video file and apply our video effect
MediaClip clip = await MediaClip.CreateFromFileAsync(videoFile);
clip.VideoEffectDefinitions.Add(new VideoEffectDefinition(typeof(GrayscaleVideoEffect).FullName));

// Create a MediaComposition object that will allow us to generate a stream source
MediaComposition compositor = new MediaComposition();
compositor.Clips.Add(clip);

// Set the stream source to the MediaElement control
this.VideoPlayer.SetMediaStreamSource(compositor.GenerateMediaStreamSource());
}
[/code]

Pretty simple, isn’t it? We obtain a reference to the video file packaged with the app and create a MediaClip from it. Then, it’s a matter of adding a new VideoEffectDefinition to it with the full name (including namespace) of our custom video effect – the runtime will take care of fetching the type, activating and instancing it. Really easy compared to how convoluted it was in WinRT 8.1!

For displaying the video on the MediaElement, create a MediaComposition object and add the clip to it. Then it’s a matter of creating a MediaStreamSource from it with the GenerateMediaStreamSource function and passing it to our video playing control. The final result should look like this:

Grayscale video effect in action

While easy to do and good looking, this approach comes with some caveats. Since we are doing all our processing on the CPU side, computational load is big (it can quickly eat up one entire CPU core even with 720p videos) and memory usage is high since we are allocating a new buffer for each frame – this can be up to 60 allocations per second! It a future article we will look into doing it with GPU acceleration through the Win2D library.

Source code

The source code for this sample can be downloaded from the GitHub UWP-Samples repository, under the CustomVideoEffect subdirectory.

Iris blur (blur around borders) effect using Win2D

Blur effects are getting pretty common in app designs, especially since iOS 7 started introducing them in some OS components like Control Center – and even the Windows 10 Start Menu uses the same effect to display a “frosted glass” look over the current background window.

Instead of a simple blur, which has been already explained by the awesome Deani Hansen, we are going to implement an iris blur (as Photoshop calls it; other resources call it “blur around borders”, and Instagram names it “tilt shift” with a radial blur in an UWP app by using the awesome Win2D library. It consists of a circular or ellipsoid area where the image shows focused, but everything else around it is defocused (or “blurred”) progressively, to give it a nice fading effect with no solid transition. So, let’s get started!

Approach

To achieve the result shown above, we are going to draw a blurred version of the image (in our case, a very beautiful one taken from Windows 10’s Spotlight backgrounds) over the original one – however, it will have a transparency mask applied so it can show a “hole” where there is no blurring. For additional artistic result, the hole won’t have clearly defined borders – instead we are going to use a radial gradient so it blends progressively over the non-blurred image. The following image describes how the blurred image with mask applied will be obtained:

Drawing the blurred image with a mask to obtain the overlay

We could store the resulting image in a CanvasRenderTarget instance and then draw it to our CanvasControl when needed – however, we can skip this intermediate step if we directly draw the original image and then the blurred one on top, just like the followind diagram shows:

Drawing the blur overlay over the original image and obtaining the final result

With all concepts clear, let’s go ahead with the implementation – I promise you it’s going to be really easy!

Implementation

Start by adding the Win2D.UWP library to your project from NuGet, and creating a CanvasControl in XAML. Hook up its CreateResources event and instantiate a new member variable of type CanvasRadialGradientBrush – along with loading the image we are going to draw. Our radial brush will have Colors.Transparent as a starting colour and Colors.Black as the ending one – the ending one could have been Colors.White or any other solid one though, as the layer will only take the alpha (transparency) component into account.

[code lang=”csharp”]
private void Canvas_CreateResources(Microsoft.Graphics.Canvas.UI.Xaml.CanvasControl sender, Microsoft.Graphics.Canvas.UI.CanvasCreateResourcesEventArgs args)
{
// Create instance of radial gradient brush; the center will be transparent and the extremes opaque black.
radialBrush = new CanvasRadialGradientBrush(sender, Colors.Transparent, Colors.Black);

// Load image to draw.
args.TrackAsyncAction(Task.Run(async () =>
{
image = await CanvasBitmap.LoadAsync(sender, new Uri("ms-appx:///SpotlightImage.png"));
}).AsAsyncAction());
}
[/code]

Next, we are going to wire up the Draw event – and perform all of our drawing there. Start by clearing the CanvasDrawingSession’s background to a colour of your choice, and then set the Center, RadiusX and RadiusY parameters of the radial gradient brush to meaningful values (in our case the center is always the center of the image/canvas, and the radius will be updated through a Slider control); then, draw the untouched image through CanvasDrawingSession.DrawImage:

[code lang=”csharp”]
// Start drawing session and clear background to white.
var session = args.DrawingSession;
args.DrawingSession.Clear(Colors.White);

// Set the center of the radial gradient as the center of the image.
radialBrush.Center = new System.Numerics.Vector2((float)(image.Size.Width / 2.0f), (float)(image.Size.Height / 2.0f));
// Assing gradient radius from slider control.
radialBrush.RadiusX = radialBrush.RadiusY = (float)BlurRadius.Value;

// Draw unaltered image first.
session.DrawImage(image, image.Bounds);
[/code]

Now comes the fun part – working with layers. The logic behind is that you create a layer by calling CanvasDrawingSession.CreateLayer and passing an opacity value, ICanvasBrush or CanvasGeometry and everything that is drawn from that point is affected by the opacity/mask/clipping area – pretty convenient, huh? Then, to stop using it, you just have to Dispose the CanvasActiveLayer – or instead, wrap everything inside an using block.

So, we are going to pass the CanvasRadialGradientBrush as the mask parameter, and then draw the image again but after applying a GaussianBlurEffect on it. This way, the masked, blurred version of the image will draw on top of the solid one, composing the desided effect:

[code lang=”csharp”]
// Create a layer, this way all elements drawn will be affected by a transparent mask
// which in our case is the radial gradient.
using (session.CreateLayer(radialBrush))
{
// Create gaussian blur effect.
using (var blurEffect = new GaussianBlurEffect())
{
// Set image to blur.
blurEffect.Source = image;
// Set blur amount from slider control.
blurEffect.BlurAmount = (float)BlurAmount.Value;
// Explicitly set optimization mode to highest quality, since we are using big blur amount values.
blurEffect.Optimization = EffectOptimization.Quality;
// This prevents the blur effect from wrapping around.
blurEffect.BorderMode = EffectBorderMode.Hard;
// Draw blurred image on top of the unaltered one. It will be masked by the radial gradient
// thus showing a transparent hole in the middle, and properly overlaying the alpha values.
session.DrawImage(blurEffect, 0, 0);
}
}
[/code]

I told you it was easy, wasn’t it? And just for reference, here is a video of how the effect looks in the sample project that complements this tutorial:

Source code

Get the source code for the entire sample project in the Win2D-Samples GitHub repository, under the IrisBlurWin2D subfolder.