One of the multiple improvements that UWP has added to background task execution is the ability to directly invoke them from the app’s foreground window. This is extremely helpful if you are using it to update the appearance of the Live Tile using a XamlRenderingBackgroundTask – doing the same thing from the foreground isn’t trivial, the main reason being that the UIElement you want to render when calling RenderTargetBitmap.RenderAsync must be part of the current page’s visual tree (otherwise you will get an ArgumentException with the ambiguous message Value does not fall within the expected range). Before, it was solved by embedding it on the page’s XAML but with collapsed visibility – but thankfully, we don’t need to keep using this ugly hack!
In this brief tutorial we are going to learn how to use this new feature to our advantage, and call our background task whenever we want to instantly update the image of the Live Tile with new content – in this case, a text message.
Requisites
You should already have an existing UWP app project that has a Windows Runtime Component project with the background task code – preferably one derived from XamlRenderingBackgroundTask. If not, well – you can still follow the instructions and get the source code for the entire project (linked at the end of the post). Having used background tasks previously will make it easier too!
Adding the declaration to application manifest
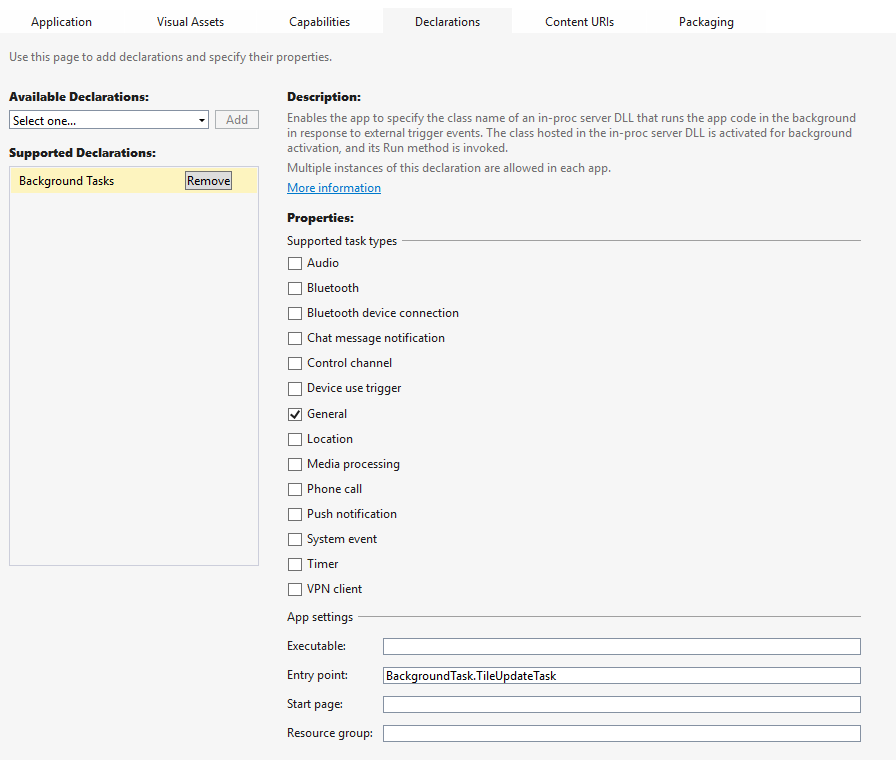
First, we need to add a Background Tasks declaration to the manifest. This will tell the runtime that we are indeed using them in the app, and will arrange the appropriate permissions for it to be executed. Open the Package.appxmanifest file and navigate to the Declarations tab. There, we are going to add a new declaration of type Background Tasks, select General from Supported task types and type the name of the class that implements the background task (including full namespace) on the Entry point field (note that you may already have this declaration if you are already using launching the task from a timer or from a system event – if so, we could even get away without selecting the General type, but do it anyway just to be sure).
Implementing the background task
This is going to be a bit high level, since previous experience on background tasks is assumed. To begin with, we are going to create a custom UserControl that will hold the layout for the content of the tile – do it as you please, as we are going to use a coloured Border with a TextBlock inside for our sample. Then, instantiate it on the OnRun method of the task, and set its Width and Height – we are using 150×150, which is the size of the medium tile at 100% scale. You could detect the screen resolution and provide the scaled version accordingly – just don’t try rendering all of them, as it would use a lot of CPU and memory and the task would probably be cancelled!
[code lang=”csharp”]
// Create instance of the control that contains the layout of the Live Tile
MediumTileControl control = new MediumTileControl();
control.Width = TileWidth;
control.Height = TileHeight;
[/code]
Make any adjustments you like to the control before being rendered – like changing the background colour, the text to be shown (which is what we are going to do) or any images it may have. Customize it as necessary to reflect the correct information in the Live Tile.
[code lang=”csharp”]
// If we have received a message in the parameters, overwrite the default "Hello, Live Tile!" one
var triggerDetails = taskInstance.TriggerDetails as ApplicationTriggerDetails;
if (triggerDetails != null)
{
object tileMessage = null;
if (triggerDetails.Arguments.TryGetValue("Message", out tileMessage))
{
if (tileMessage is string)
{
control.Message = (string)tileMessage;
}
}
}
[/code]
Now, we are going to proceed to render the control to a bitmap and save it to a file. This is pretty standard stuff: we instantiate a RenderTargetBitmap, call RenderAsync passing our UserControl and desired final size, and open a file on the local storage for saving the bitmap. We will encode it to PNG format (so we keep transparency) using BitmapEncoder – and as a shortcut, we will create an intermediate SoftwareBitmap that will be filled with the pixels (via GetPixelsAsync) from the RenderTargetBitmap, and feed to the BitmapEncoder through SetSoftwareBitmap. Finally, we tell the BitmapEncoder to flush (via FlushAsync) the data to the file.
[code lang=”csharp”]
// Render the tile control to a RenderTargetBitmap
RenderTargetBitmap bitmap = new RenderTargetBitmap();
await bitmap.RenderAsync(control, TileWidth, TileHeight);
// Now we are going to save it to a PNG file, so create/open it on local storage
var file = await ApplicationData.Current.LocalFolder.CreateFileAsync(TileImageFilename, CreationCollisionOption.ReplaceExisting);
using (var stream = await file.OpenAsync(FileAccessMode.ReadWrite))
{
// Create a BitmapEncoder for encoding to PNG
BitmapEncoder encoder = await BitmapEncoder.CreateAsync(BitmapEncoder.PngEncoderId, stream);
// Create a SoftwareBitmap from the RenderTargetBitmap, as it will be easier to save to disk
using (var softwareBitmap = new SoftwareBitmap(BitmapPixelFormat.Bgra8, TileWidth, TileHeight, BitmapAlphaMode.Premultiplied))
{
// Copy bitmap data
softwareBitmap.CopyFromBuffer(await bitmap.GetPixelsAsync());
// Encode and save to file
encoder.SetSoftwareBitmap(softwareBitmap);
await encoder.FlushAsync();
}
}
[/code]
For updating the Live Tile contents, we are going to use the excellent Notifications Extensions library – it will allow us to easily generate the XML content for the tile notification by creating statically typed objects. Finally, obtain a TileUpdater by calling TileUpdateManager.CreateTileUpdaterForApplication and call its Update method to send the notification to the tile.
[code lang=”csharp”]
// Use the NotificationsExtensions library to easily configure a tile update
TileContent mediumTileContent = new TileContent()
{
Visual = new TileVisual()
{
TileMedium = new TileBinding()
{
Content = new TileBindingContentAdaptive()
{
BackgroundImage = new TileBackgroundImage()
{
Overlay = 0,
Source = new TileImageSource("ms-appdata:///local/" + TileImageFilename),
}
}
}
}
};
// Clean previous update from Live Tile and update with the new parameters
var tileUpdater = TileUpdateManager.CreateTileUpdaterForApplication();
tileUpdater.Clear();
tileUpdater.Update(new TileNotification(mediumTileContent.GetXml()));
[/code]
Registering and calling the background task
Going back to our UWP app project, we need to register out task to it can be called when needed. Start by adding a member variable of type ApplicationTrigger to whichever place you are going to run your background task registration from – we are going to use the app’s MainPage but you could do it from its own service, etc.
Next, we need to register the task via a BackgroundTaskBuilder. Pretty standard stuff, except that we have to initialize the ApplicationTrigger member variable and pass it to the builder through SetTrigger. If the task was registered in a previous execution then we have to retrieve that registration (through BackgroundTaskRegistration.AllTasks) and obtain the reference to the trigger from there.
[code lang=”csharp”]
if (!BackgroundTaskRegistration.AllTasks.Any(reg => reg.Value.Name == TileRegistrationName))
{
// Configure task parameters
BackgroundTaskBuilder builder = new BackgroundTaskBuilder();
builder.TaskEntryPoint = typeof(TileUpdateTask).FullName;
builder.Name = TileRegistrationName;
// Remember to set an ApplicationTrigger so we can run it on demand later
this.backgroundTrigger = new ApplicationTrigger();
builder.SetTrigger(backgroundTrigger);
builder.Register();
MessageDialog infoDialog = new MessageDialog("Background task successfully registered.", "Info");
await infoDialog.ShowAsync();
}
else
{
// Fetch registration details and trigger if already existing
var registration = BackgroundTaskRegistration.AllTasks.FirstOrDefault(reg => reg.Value.Name == TileRegistrationName).Value as BackgroundTaskRegistration;
this.backgroundTrigger = registration.Trigger as ApplicationTrigger;
MessageDialog infoDialog = new MessageDialog("Background task registration data successfully retrieved.", "Info");
await infoDialog.ShowAsync();
}
[/code]
To wrap everything up, we now can call the task whenever we want (in the sample we are using a Button.Click event for this). We just have to call the method RequestAsync from the ApplicationTrigger we instantiated/retrieved previously – and the task will run, returning a code to tell us if it was able to launch, its execution was denied or any errors happened. Try it and watch the tile change in real time!
[code lang=”csharp”]
var taskParameters = new ValueSet();
// Send a custom message if we have typed one
if (!string.IsNullOrEmpty(MessageText.Text))
{
taskParameters.Add("Message", MessageText.Text);
}
// Fetch execution results and inform user accordingly
var taskResult = await backgroundTrigger.RequestAsync(taskParameters);
[/code]
Source code
You can grab it from the UWP-Samples repository at GitHub – it’s on the BackgroundTaskFromForeground folder. As you can see, from now on all smaller UWP samples and tutorials will be added to the same repository, hopefully making it easier to browse.